Introduction
Stepper motors are widely used in a variety of industrial and hobby applications due to their precise motion control and high torque. However, controlling stepper motors can be challenging without the right equipment. The TB6560 stepper motor driver is a popular choice among hobbyists due to its affordability and ease of use.
In this article, we will explore how to control a “TB6560 Stepper Motor Driver” with an Arduino, which opens up a world of possibilities for DIY projects.
What is TB6560 Stepper Motor Driver?
The TB6560 stepper motor driver is an integrated circuit that is used to control bipolar stepper motors. It is a widely used and popular driver among hobbyists due to its affordability, ease of use, and ability to control larger stepper motors with higher torque. The TB6560 driver is designed to operate in full, half, quarter, and eighth-step modes, which allows for precise motion control.

Hardware Components
To interface a TB6560 Stepper Motor Driver with Arduino, you’ll need the following hardware components to get started:
| Components | Value | Qty |
|---|---|---|
| Arduino UNO | – | 1 |
| USB Cable Type A to B | – | 1 |
| DC Power for Arduino | – | 1 |
| Stepper Motor Driver | TB6560 | 1 |
| DC Motor | – | 1 |
| Jumper Wires | – | 1 |
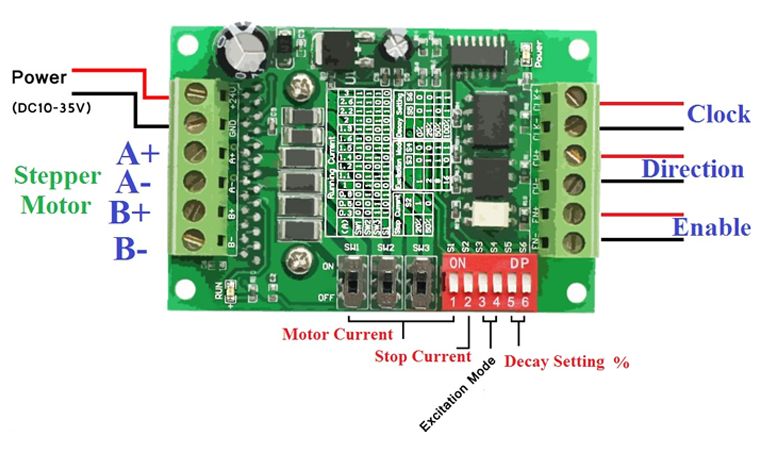
TB6560 Stepper Motor Driver Pinout

TB6560 Stepper Motor Driver Circuit
Make connections according to the circuit diagram given below.

Wiring / Connections
| Arduino | TB6560 Stepper Motor Driver | Motor |
|---|---|---|
| GND | CW-, CLK- | |
| D3 | CLK+ | |
| D2 | CW+ | |
| B- | D | |
| B+ | B | |
| A- | C | |
| A+ | A |
Installing Arduino IDE
First, you need to install Arduino IDE Software from its official website Arduino. Here is a simple step-by-step guide on “How to install Arduino IDE“.
Installing Libraries
Before you start uploading a code, download and unzip the following libraries at /Program Files(x86)/Arduino/Libraries (default), in order to use the sensor with the Arduino board. Here is a simple step-by-step guide on “How to Add Libraries in Arduino IDE“.
TB6560 Arduino example code
Now copy the following code and upload it to Arduino IDE Software.
// Define stepper motor connections and steps per revolution:
#define dirPin 2
#define stepPin 3
#define stepsPerRevolution 1600

void setup() {
  // Declare pins as output:
  pinMode(stepPin, OUTPUT);
  pinMode(dirPin, OUTPUT);
}

void loop() {
  // Set the spinning direction clockwise:
  digitalWrite(dirPin, HIGH);

  // Spin the stepper motor 1 revolution slowly:
  for (int i = 0; i < stepsPerRevolution; i++) {
    // These four lines result in 1 step:
    digitalWrite(stepPin, HIGH);
    delayMicroseconds(2000);
    digitalWrite(stepPin, LOW);
    delayMicroseconds(2000);
  }

  delay(1000);

  // Set the spinning direction counterclockwise:
  digitalWrite(dirPin, LOW);

  // Spin the stepper motor 1 revolution quickly:
  for (int i = 0; i < stepsPerRevolution; i++) {
    // These four lines result in 1 step:
    digitalWrite(stepPin, HIGH);
    delayMicroseconds(1000);
    digitalWrite(stepPin, LOW);
    delayMicroseconds(1000);
  }

  delay(1000);

  // Set the spinning direction clockwise:
  digitalWrite(dirPin, HIGH);

  // Spin the stepper motor 5 revolutions fast:
  for (int i = 0; i < 5 * stepsPerRevolution; i++) {
    // These four lines result in 1 step:
    digitalWrite(stepPin, HIGH);
    delayMicroseconds(500);
    digitalWrite(stepPin, LOW);
    delayMicroseconds(500);
  }

  delay(1000);

  // Set the spinning direction counterclockwise:
  digitalWrite(dirPin, LOW);

  // Spin the stepper motor 5 revolutions fast:
  for (int i = 0; i < 5 * stepsPerRevolution; i++) {
    // These four lines result in 1 step:
    digitalWrite(stepPin, HIGH);
    delayMicroseconds(500);
    digitalWrite(stepPin, LOW);
    delayMicroseconds(500);
  }

  delay(1000);
}
Code Explanation
This Arduino code defines the connections and the steps per revolution for a stepper motor and sets up the pins for output. The code then enters an infinite loop where it rotates the stepper motor in various directions and speeds using the defined pins and steps per revolution.
In the first rotation, the motor spins clockwise for one revolution at a slow speed. In the second rotation, the motor spins counterclockwise for one revolution at a faster speed. In the third and fourth rotations, the motor spins clockwise and counterclockwise respectively for five revolutions at a fast speed.
The delay function is used to pause the rotation between each of the four movements. The delay time is set to 1000 milliseconds or 1 second, but this value can be adjusted to change the pause time between rotations.
Overall, this code provides a basic example of how to control the direction and speed of a stepper motor using an Arduino and the TB6560 driver. With some modifications, this code can be customized to fit specific project requirements.
AccelStepper example code
// Include the AccelStepper library:
#include <AccelStepper.h>

// Define stepper motor connections and motor interface type. Motor interface type must be set to 1 when using a driver:
#define dirPin 2
#define stepPin 3
#define motorInterfaceType 1

// Create a new instance of the AccelStepper class:
AccelStepper stepper = AccelStepper(motorInterfaceType, stepPin, dirPin);

void setup() {
  // Set the maximum speed and acceleration:
  stepper.setMaxSpeed(1000);
  stepper.setAcceleration(500);
}

void loop() {
  // Set the target position:
  stepper.moveTo(8000);
  // Run to target position with set speed and acceleration/deceleration:
  stepper.runToPosition();

  delay(1000);

  // Move back to zero:
  stepper.moveTo(0);
  stepper.runToPosition();

  delay(1000);
}
This code is an Arduino sketch that controls a stepper motor using the AccelStepper library and a TB6560 stepper motor driver. The code defines the stepper motor connections, sets the maximum speed and acceleration, and moves the motor to a target position with acceleration and deceleration. The code then moves the motor back to its original position and repeats the process.
Applications
Here are some applications of the TB6560 Stepper Motor Driver:
- CNC machines
- 3D printers
- Robotics
- Automated assembly lines
- Textile machines
- Medical equipment
- Surveillance cameras with pan-tilt function
- Telescope mounts
- Antenna rotators
- Gaming and simulation rigs
- Laser engravers
- Conveyor systems
- Packaging machines
- Industrial automation
- Automotive systems
Conclusion
Using an Arduino to control a TB6560 stepper motor driver is an excellent way to get started with precision motion control. Whether you’re building a 3D printer or a robotic arm, this setup can handle the job.


